Subscribe for Weekly Tutorials
BONUS: subscribe now to download our Top Tutorials Ebook!
Getting Data from a UserForm
How to get data from a UserForm in Excel, including from: text inputs (TextBox), list boxes (ListBox), drop-down menus (ComboBox), checkboxes (CheckBox), and option buttons (OptionButton).
This tutorial shows you how to get a user's input from the above controls and put in into the spreadsheet and work with it inside of macros and VBA.
Sections:
Where to Put the Code Examples
Where to Put the Code Examples
Ususally, you get data from a UserForm when the user clicks a button that then causes something to happen with the data in the form. As such, we want to put the code that gets the data into the place where code is run when the user clicks the correct button.
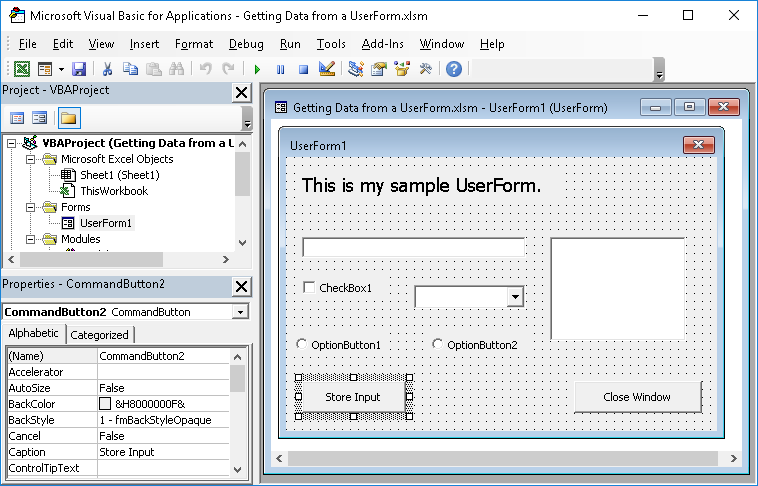
Open the UserForm and find the button that you want to cause data to be stored and then double-click it.

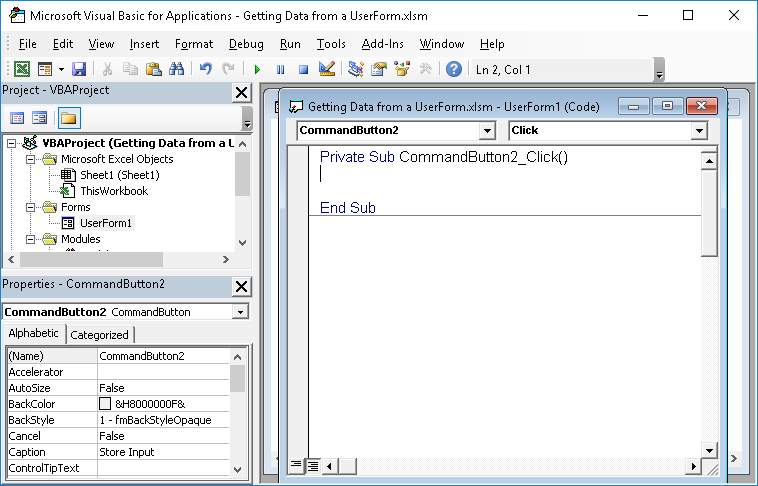
Once you double-click it, you should see something like this:

CommandButton2 is the name of the button that I clicked. You must put the code within the Sub section that ends with _Click() just like it does in the image above.
Everything that you put into this code section for CommandButton2 will run when the user clicks that button on the form.
Note: this is the code section for the entire UserForm and all of the controls within it. Once you build-out your form, you will see many different sections of code within here.
The sample file for this tutorial has a few extra code sections and you can look at those to see how data can be pre-populated into the UserForm.
Get Data from a TextBox
TextBox1.TextTextBox1 - name of the TextBox
This gets whatever the user entered into the text box.
Useful Code
'Get input from TextBox
TextBoxValue = TextBox1.Text

'Store input in the worksheet
Sheets("Sheet1").Range("A2").Value = TextBoxValue
This sets the TextBoxValue variable equal to the value contained in the text box.
Once we have that data inside of a variable, we can do anything that we want with it.
In this case, the value will be stored in cell A2 on Sheet1.
Get Data from a ListBox
ListBox1.TextListBox1 - name of the ListBox
This gets whatever the user selected from the list box.
Useful Code
'Get input from ListBox
ListBoxValue = ListBox1.Text

'Store input in the worksheet
Sheets("Sheet1").Range("B2").Value = ListBoxValue
This sets the ListBoxValue variable equal to the selection from the ListBox.
Once we have that data inside of a variable, we can do anything that we want with it.
Here, the value will be stored in cell B2 on Sheet1.
Get Data from a ComboBox
ComboBox1.TextComboBox1 - name of the ComboBox
This gets whatever the user selected from the combo box drop-down menu.
Useful Code
'Get input from ComboBox
ComboBoxValue = ComboBox1.Text

'Store input in the worksheet
Sheets("Sheet1").Range("C2").Value = ComboBoxValue
This sets the ComboBoxValue variable equal to the selection from the ComboBox.
Once we have that data inside of a variable, we can do anything that we want with it.
Here, the value will be stored in cell C2 on Sheet1.
Get Data from a CheckBox
CheckBox1.ValueCheckBox1 - name of the CheckBox
This gets the value of the check box; it can be either True or False.
True - means the box was checked.
False - means the box was not checked.
Useful Code
'Get input from CheckBox
CheckBoxValue = CheckBox1.Value

'Store input in the worksheet
Sheets("Sheet1").Range("D2").Value = CheckBoxValue
This sets the CheckBoxValue variable equal to the True or False value from the CheckBox.
Once we have that data inside of a variable, we can do anything that we want with it.
Here, the value will be stored in cell D2 on Sheet1.
Get Data from a OptionButton
OptionButton1.ValueOptionButton1 - name of the OptionBox that is being checked.
This gets the value of the option box; it can be either True or False.
True - means the option was selected.
False - means the option was not selected.
Useful Code
OptionButtons always come in groups; they are never singular because then you couldn't de-select them.
As a result of this, the above method for check if an OptionButton was selected or not is rather cumbersome; we don't want to check each OptionButton separately.
To remedy this, we have to use a loop and the resulting method for figuring out which OptionButton was selected might seem confusing at first.
'Loop through the controls in the form.
For Each FormControl In Me.Controls

    'Check only OptionButtons
    If TypeName(FormControl) = "OptionButton" Then

        ' Check the status of the OptionButton.
        If FormControl.Value = True Then

            OptionButtonValue = FormControl.Caption

            Exit For
        End If

    End If

Next

'Store input in the worksheet
Sheets("Sheet1").Range("E2").Value = OptionButtonValue
The first part of this code loops through all of the controls in the form; then, it looks for controls that are OptionButtons and then it checks to see which OptionButton was selected; once it finds the selected OptionButton, it sets the OptionButtonValue variable equal to the caption of the button.
The Exit For section of the loop simply tells the code to exit the loop once it finds the OptionButton that was selected.
Once the value is put into a variable, we can then work with it. The second part of the code puts the value into cel E2.
Notes
Getting data from most controls is pretty straightforward and simple, using the .Text or .Value method after the name of the control whose data we want to get. The only tricky one is for the OptionButtons since, there, you can only allow the user to select one option per group; now, if you didn't want to do a loop, you could do the longer, but perhaps more intuitive, process of using a bunch of IF Then statements to check each OptionButton, but once you have more than a few OptionButtons, this becomes a real pain.
This tutorial was meant to be and overview and show you how to get the data from the UserForm in basic circumstances. There are a lot of scenarios that are not covered here, such as mutliple groups of OptionButtons and multiple selections from a ListBox; more advanced topics like that will be covered in their own tutorials.
For now, you should have at least a basic, and working, understanding of how to get data from the UserForm.
Make sure to download the sample file for the tutorial so you can see all of this code in action.


