")

Subscribe for Weekly Tutorials
BONUS: subscribe now to download our Top Tutorials Ebook!
Move Items between ListBox Controls
How to move single items as well as multiple items from one ListBox to another ListBox in UserForms in Excel.
The benefit of having multiple ListBox controls is that you can move items between them; in this example you will learn how to move all items from one list to another as well as how to move individual items between lists.
Sections:
Move Selected Items to the Right
Move Selected Items to the Left
Before We Begin
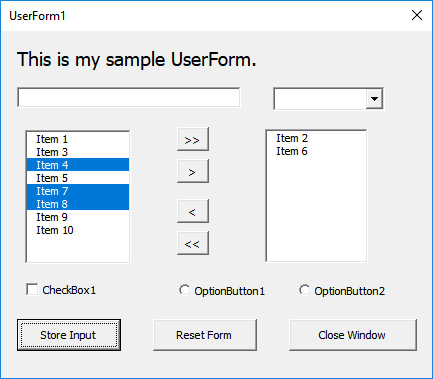
You need to have at least two ListBox controls on your form.
In this tutorial, we have one ListBox on the left, named ListBox1 and one ListBox on the right, named ListBox2.
You also need some buttons that you will use to cause the items to move between the boxes.
Multiple Selections
All examples here allow for single and multiple selections to be made in each ListBox. You can enable this feature by changing the MultiSelect property for the ListBox controls.
To learn more about enabling this feature, view our tutorial: Multiple Selections in a ListBox
Move All Items to the Right
Moves all items from ListBox1 to ListBox2.
'Add items to the other ListBox
For i = 0 To ListBox1.ListCount - 1
    ListBox2.AddItem ListBox1.List(i)
Next i

'Remove the items from the ListBox
ListBox1.Clear

'Remove items filled with RowSource
'ListBox1.RowSource=""
ListBox1 is the box on the left.
ListBox2 is the box on the right.
This code loops through all of the items in the first box and adds everything to the box on the right.
Below here is a breakdown of the above code.
Loop
For i = 0 To ListBox1.ListCount - 1
    ListBox2.AddItem ListBox1.List(i)
Next i
This is what loops through everything and then copies the items to the other ListBox.
Clear Items
'Remove the items from the ListBox
ListBox1.Clear

'Remove items filled with RowSource
'ListBox1.RowSource=""
Once you have copied the items from the box on the left to the box on the right, you need to clear all items from the first box.
This shows two ways to clear the items.
ListBox1.Clear clears ListBox1 and will work in most cases.
ListBox1.RowSource="" is the way to clear a ListBox that has been filled using the RowSource property. This option has been commented out because, in this example, it is not needed. It was left in for reference when you are building your UserForms.
Where to Put the Code
Put this in the Click event for the button that you want to use to move the items.
In the attached file, if you double-click the form button with these arrows >> then you will find this code.
Move All Items to the Left
Moves all items from ListBox2 to ListBox1.
This is exactly the same as the previous section except that, in the code, ListBox1 replaces ListBox2 and vice versa. As such, code explanations will not be provided in this section.
'Add the items to the other ListBox
For i = 0 To ListBox2.ListCount - 1
    ListBox1.AddItem ListBox2.List(i)
Next i

'Remove the items from the ListBox
ListBox2.Clear

'Remove items filled with RowSource
'ListBox2.RowSource=""
ListBox1 is the box on the left.
ListBox2 is the box on the right.
This code loops through all of the items in the second box and adds everything to the box on the left.
Where to Put the Code
Put this in the Click event for the button that you want to use to move the items.
In the attached file, if you double-click the form button with these arrows << then you will find this code.
Move Selected Items to the Right
This works for a single and also multiple selections.
'Loop through the items
For itemIndex = ListBox1.ListCount - 1 To 0 Step -1

    'Check if an item was selected.
    If ListBox1.Selected(itemIndex) Then

        'Move selected item to the right.
        ListBox2.AddItem ListBox1.List(itemIndex)

        'Remove selected item from the left.
        ListBox1.RemoveItem itemIndex

    End If

Next itemIndex
ListBox1 is the box on the left.
ListBox2 is the box on the right.
This code loops through the box on the left to see which items have been selected; then, it adds the selected item to the box on the right and removes that item from the box on the left.
Below, are explanations of the above code.
The Loop
The loop in this case actually goes in reverse. It moves from the bottom of the list and goes up.
It does this because, in order to identify the selected items, you have to use the index number of that item and, when you remove an item from the top of the list, the index number for each item shifts up; as a result, if you start at the top of the list and loop down through it, an error will occur.
The part of the loop that makes it start from the bottom and go up by 1 is this part:
Step -1
The Loop also creates a variable called itemIndex and this will be used to go through the list. This variable contains a number than ranges from 0 up to 1 less than the total number of items in the list. This variable is used within the loop to refer to items from the list.
Check if the Item is Selected
If ListBox1.Selected(itemIndex) ThenThis is a simple IF statement that uses the Selected property to determine if an item was selected. It uses this in conjunction with the itemIndex variable to loop through all of the items in the list.
Add the Items to the Other List
ListBox2.AddItem ListBox1.List(itemIndex)Notice that itemIndex is used to add the current item to the list.
Remove the Items from the List
ListBox1.RemoveItem itemIndexitemIndex is once again used to refer to the item to remove from the list.
Move Selected Items to the Left
This works for a single and also multiple selections.
This is exactly the same as the previous section except that, in the code, ListBox1 replaces ListBox2 and vice versa. As such, code explanations will not be provided in this section.
'Loop through the items
For itemIndex = ListBox2.ListCount - 1 To 0 Step -1

    'Check if an item was selected.
    If ListBox2.Selected(itemIndex) Then

        'Move selected item to the right.
        ListBox1.AddItem ListBox2.List(itemIndex)

        'Remove selected item from the left.
        ListBox2.RemoveItem itemIndex

    End If

Next itemIndex
Notes
Download the sample file for this tutorial to see these working examples in Excel! All code is commented and it will be easier to understand once you start to work with it rather than just read the code on a web page. Once you get the file, go to the VBA window, view the form, and double-click the buttons between the ListBox controls in order to view the code used in this tutorial.
Also, the MultiSelect properties for the lists are set at the top of the UserForm_Initialize event.
(Clicking the Store Input button in the attached file and UserForm will put only the values from the right ListBox control into the worksheet, in addition to values from the other controls in the form.)