Automatically Lock Certain Cells in Excel using a Macro
This macro allows you to have a cell automatically locked after a user enters something into it or into another specific cell, range, column, or row.
This is different than just locking an entire spreadsheet because you still want to be able to edit and work with the other cells in the worksheet without having to select and unlock them individually.
Sections:
Lock Cell Other Than the One that was Edited
Lock Cell in a Specific Column or Row
Unlock the Cells
The first thing you have to do is to unlock all of the cells in the worksheet.
- Select all of the cells by hitting Ctrl + A or clicking the square next to row 1 and column A.

- Right click in the worksheet and choose Format Cells
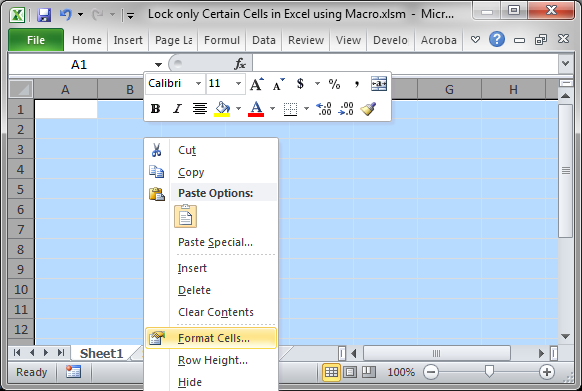
- Go to the Protection tab and uncheck the Locked option at the top.
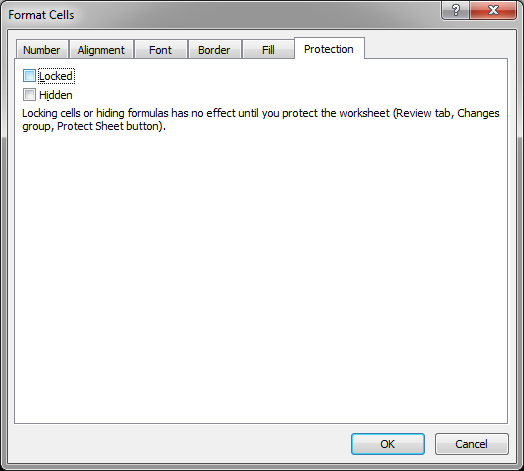
- Hit OK and you're done with this part.
Now, none of the cells in the worksheet are protected, which means that all of the cells in the worksheet will be editable when you go to protect the worksheet.
This needs to be done so that only specific cells that we choose will be locked from editing.
Macro to Auto-Lock Cells
Private Sub Worksheet_Change(ByVal Target As Range)

If Target.Address = "$A$1" And Target.Value <> "" Then

    ActiveSheet.Protect Contents:=False
    Range(Target.Address).Locked = True
    ActiveSheet.Protect Contents:=True

End If

End Sub
The important code is this part:
ActiveSheet.Protect Contents:=False
Range(Target.Address).Locked = True
ActiveSheet.Protect Contents:=True
It unprotects the worksheet, locks the cell, and then re-protects the sheet.
This macro needs to be installed into the worksheet where it will run. To do this, right-click the tab of the desired worksheet and click View Code and paste the macro into the window that opens.
This example is a generic example that is easy to modify. It checks which cell was edited and, if a certain cell was edited, it is then locked.
I will show you how to edit this macro in the examples below.
Lock a Specific Cell
Looking at the macro above, this is the line that limits the macro to run only on specific cells:
If Target.Address = "$A$1" And Target.Value <> "" Then
This says that a cell should be locked only if cell A1 was edited and it is not empty.
To make the macro work on cell B1 or D15 or any cell, just replace $A$1 with the desired cell reference. You must put dollar signs in front of the column and row reference for this to work.
You can also lock the cell only if a certain value was input by changing <> "" in the line above to = "desired value" and that allows you to do something like lock the cell only if OK was entered or something similar.
Lock Cell Other Than the One that was Edited
Change this line:
Range(Target.Address).Locked = True
Target.Address is the cell that will be locked and this says to lock the cell that was just edited.
To lock another cell, just use the Range method of referencing cells.
To lock cell B5, it would be Range(B5).Locked = True
Continue that pattern for whichever cell or range you want to lock.
Lock Last Edited Cell
You can lock the last edited cell regardless of which one it was by removing the IF statement in the macro and leaving it like this:
Private Sub Worksheet_Change(ByVal Target As Range)

ActiveSheet.Protect Contents:=False
Range(Target.Address).Locked = True
ActiveSheet.Protect Contents:=True

End Sub
Lock Cell in a Specific Column or Row
To limit the locking to a certain column or row, change the IF statement.
Limit to a row:
If Target.Row = 1 And Target.Value <> "" Then
Change the 1 to whichever row you want and the code will only run on that row.
Limit to a Column:
If Target.Column = 1 And Target.Value <> "" Then
Change the 1 to whichever column you want the code to run on.
Notes
This is a handy macro that allows you to have a lot of control over a worksheet and protecting the data within it.
I didn't show you how to password protect the worksheet here because I wanted to focus on the method needed to protect only specific cells. Once you get this form of the macro running well, then, add-in the other pieces that you want, like password protection.
Make sure to download the sample file attached to this tutorial so you can work with these examples in Excel.
Question? Ask it in our Excel Forum
Excel VBA Course - From Beginner to Expert
200+ Video Lessons 50+ Hours of Instruction 200+ Excel Guides
Become a master of VBA and Macros in Excel and learn how to automate all of your tasks in Excel with this online course. (No VBA experience required.)
: Send Emails from Excel Course Send emails to everyone in a list in Excel using a macro. Th...
Tutorial: How to use VBA/Macros to iterate through each cell in a range, either a row, a column, or ...
Tutorial: This is actually a very easy thing to do and only requires a couple lines of code. Below I...
Tutorial: This Excel VBA tutorial focuses specifically on selecting ranges of cells in Excel. This...
Tutorial: How to allow only certain people to edit certain cells or ranges in Excel. This is a sec...
Macro: Add a drop down menu or list to a cell in Excel with this free Excel macro. This is a grea...
Subscribe for Weekly Tutorials
BONUS: subscribe now to download our Top Tutorials Ebook!
Excel VBA Course - From Beginner to Expert
200+ Video Lessons
50+ Hours of Video
200+ Excel Guides
Become a master of VBA and Macros in Excel and learn how to automate all of your tasks in Excel with this online course. (No VBA experience required.)