Simple Alternatives to UserForms
This tutorial covers a few simple ways to show pop-up windows to users that allows you to present them with a message, get values from them, or fill-in a table.
When figuring out if you need a UserForm in Excel or not, it's worth noting that there are other, more simple, options that might work for you. If you have basic needs when it comes to having a pop-up window or input form, it's a good idea to consider using the InputBox and Msgbox functions or a default data input form.
Sections:
Show a Pop-up Window to a User
Get Input from the User in a Pop-up Window
Use a Default Form to Enter Data into a Table
Show a Pop-up Window to a User
MsgBox - this function allows you to display a pop-up window that contains any message you want and some buttons that allow the user to acknowledge that they saw the pop-up window.
Basic Message
This code creates the most basic pop-up window with a message.
Sub basic_msgbox()

MsgBox "Hi, this is my message."

End Sub
When you run this code in Excel, it looks like this:
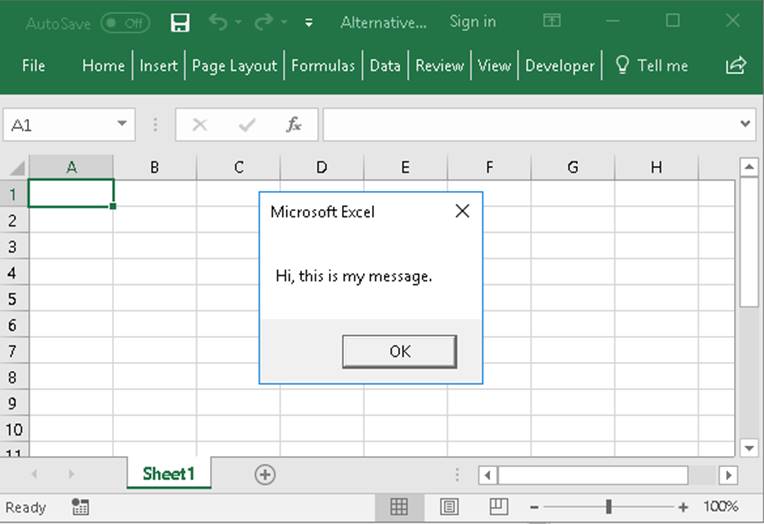
This allows you to convey a message to the person using Excel. They can do nothing with this message but acknowledge that they saw it, basically, by hitting the OK button.
Also, while this window is visible, the user cannot do anything at all in Excel, which forces the user to notice the message.
Message with Lots of Buttons
You can add up to 3 buttons at a time to your message box pop-up window.
Here is a sample that adds a "Yes" "No" and "Cancel" button to the window.
Sub buttons_msgbox()

MsgBox "Hi, this is my message. Who would win in a fight, Thor or Pac-Man?", vbYesNoCancel

End Sub
In the example, a second argument was added to tell the function what buttons we want to appear, vbYesNoCancel.
When you run this code in Excel, the window looks like this:
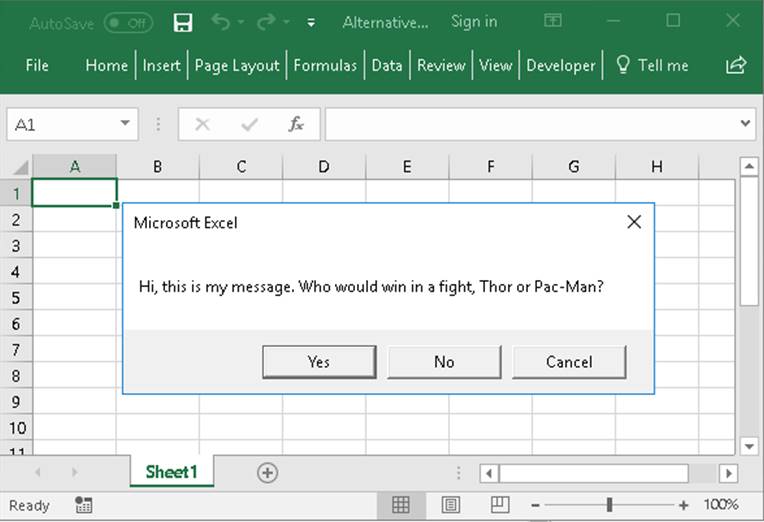
Using this message box, with 3 buttons, allows the user to make a decision, rather than just acknowledge that they saw a pop-up window.
Figure out Which Button was Clicked
Perhaps the most important thing with the MsgBox function is to be able to know which button the user clicked.
You do this by setting a variable equal to the msgbox function, like this:
Sub button_click_msgbox()

response = MsgBox("Hi, this is my message. Who would win in a fight, Thor or Pac-Man?", vbYesNoCancel)

End Sub
The MsgBox function will return a number and that number will now be stored in the response variable.
We simply check the number stored in the response variable to figure out which button the user clicked.
To do that, add some IF statements to the code like this:
Sub button_click_msgbox()

response = MsgBox("Hi, this is my message. Who would win in a fight, Thor or Pac-Man?", vbYesNoCancel)

If response = 6 Then
    MsgBox "You clicked Yes"
ElseIf response = 7 Then
    MsgBox "You clicked No"
ElseIf response = 2 Then
    MsgBox "You clicked Cancel"
End If

End Sub
Try this code in Excel and you will see another smaller msgbox appear after you click a button in the bigger one; the smaller one will tell you which button you clicked.
More Information
This tutorial is meant to give you an overview of the MsgBox function, but there is a lot more to learn about it, including all of the possible options for this function.
View our tutorial on the MsgBox function in order to get a much more comprehensive explanation of this function and more examples using it.
Get Input from the User in a Pop-up Window
InputBox - this function allows you to show the user a pop-up window with a section for input that the user can type into.
Get a User's Input
Sub user_input()

userinput = InputBox("Type your input below:")

End Sub
In order to get the user's input from the pop-up window, we must set a variable, in this case userinput, equal to the InputBox function.
Running this in Excel looks like this:
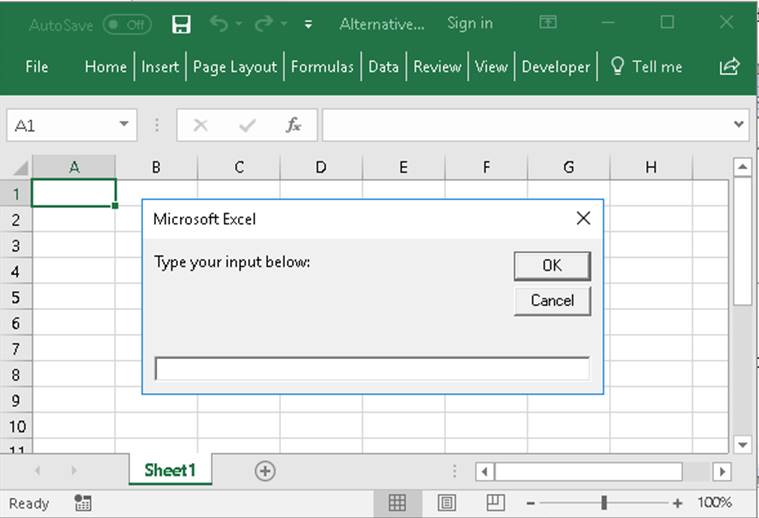
It's a very simple pop-up window, but it allows you to solicit input from the user.
You can do anything you want with the input once it's inside of the macro, just reference the userinput variable that we put in the macro.
For instance, to output the user's input into a msgbox, you could do something like this:
Sub user_input()

userinput = InputBox("Type your input below:")

MsgBox userinput

End Sub
Run this code in Excel and you will have a visual confirmation that you got the user's input after they submitted it.
This isn't the most useful thing to do with a user's input; however, it provides visual confirmation that everything is working and you can go from there to change the macro.
More Information
There is more that you can do with the InputBox function, such as figure out if the user hit the cancel button, input default text, and slightly change the appearance of the pop-up window.
To get more information on this, view our InputBox tutorial.
Use a Default Form to Enter Data into a Table
Excel has a neat, yet hidden, little feature that allows you to enter data into a table using a form that is automatically built by Excel.
Once you have data setup in a Table, you simply click the "Form" button and then a form pops up and allows you to manage the data in the Table from there.
The form will look similar to this:
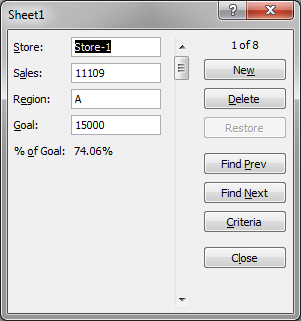
To use this feature, you must enable a hidden command in Excel and make sure your data is setup in the Table format.
Learn how to do this from our tutorial on Using a Form to Enter Data into a Table in Excel.
Notes
You have just seen 3 different ways to show pop-up windows to users; these methods enable you to show the user a message, solicit input from them, and help them put data into a table. All of these methods are much easier to use than creating a UserForm and, the purpose of showing you these other options, is so that you don't waste hours creating a UserForm if you don't need one in the first place.
That said, I love UserForms and once you learn more about them you will see just how amazing and useful they can be.
Don't forget to download the sample file for this tutorial to see the above examples in Excel.
Question? Ask it in our Excel Forum
Excel VBA Course - From Beginner to Expert
200+ Video Lessons 50+ Hours of Instruction 200+ Excel Guides
Become a master of VBA and Macros in Excel and learn how to automate all of your tasks in Excel with this online course. (No VBA experience required.)
Tutorial: Multiple methods for adding text to a UserForm via a Label. This includes a simple way to ...
Tutorial: 2 Tips that will get your spreadsheet looking nice without the use of the evil merged cel...
Tutorial: Explanation of UserForm Events in Excel. This includes what they are, how to use them, and...
Tutorial: Add values to a ComboBox in a UserForm in Excel. There are 3 simple ways to add values, tw...
Tutorial: How to take data from Excel and put it into a UserForm. This is useful when you use a form...
Tutorial: How to use the SWITCH() function for Excel. SWITCH() allows you to match a series of valu...
Subscribe for Weekly Tutorials
BONUS: subscribe now to download our Top Tutorials Ebook!
Excel VBA Course - From Beginner to Expert
200+ Video Lessons
50+ Hours of Video
200+ Excel Guides
Become a master of VBA and Macros in Excel and learn how to automate all of your tasks in Excel with this online course. (No VBA experience required.)