How to Arrange Data within Cells in Excel
In this tutorial I am going to look at cell alignment / arrangement. These features allow you to change how data looks WITHIN cells in Excel.
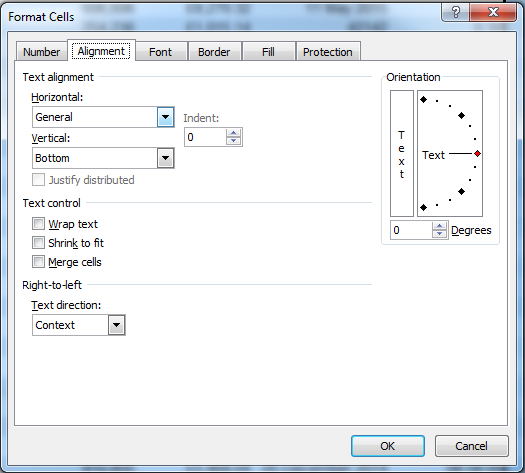
To align one or more cells just select the cells you wish to align and navigate to the Alignment section of the Home tab. (For versions of Excel prior to 2007, right-click on selected cells, select Format Cells and then the Alignment tab)

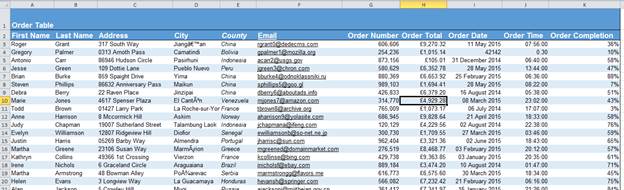
For these examples I am going to re-use the Order Table from the previous tutorials. This is how the table currently looks:
Cells can be aligned in both the vertical and horizontal planes. By default Excel will left align text and right align numbers. All cells will be bottom aligned by default.
Say I wanted my column headings to be centered. First I select the column headings then click on the  button in the Alignment section of the Home tab. The buttons to the left and right of this will align left and right respectively.
The alignment buttons above these will adjust the vertical alignments. From left to right, the first will align top, the next button will align middle and the last will bottom align.
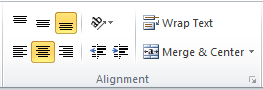

For more advanced Alignment features, I can use the Wrap Text and/or Merge & Center buttons.
Looking at the Wrap Text button first, this button allows text/cell values to run on to more than one line within its own cell if there isnt enough space. This allows you to reduce the length of your cells without increasing the height too much, which is a handy tool to make a table look neater.
As the Order Number, Order Total, Order Time and Order Completion column headings are much wider than the numbers contained within the columns I am going to apply text wrapping to these cells. I select the cells then click the Wrap Text button. I also increase the height of the row and decrease the width of the columns to allow the text wrapping to take effect like it is below:

Now looking at Merge & Center, I have a table header which would look much better if it was centered over the entire table instead of stuck in a single cell off to the left:

Merging cells combines the contents and formatting of one individual cell to multiple cells. Once multiple cells have been merged they will act as one individual cell. I am going to merge my table title to demonstrate this.
First I select the cells (A1:K1) then I click the Merge & Center. The cells will then be merged and center aligned. As the row for my title is quite large I have also middle aligned it.

As you can see this looks much better. It is important to note that when merging cells only the contents of the top left cell will be merged with the other cells. Data in the other cells will be lost on merging.
Another feature worth noting is the Indent button, which allows you to indent the data in a cell as much or as little as you want.
You can access more alignment features by right-clicking a cell, going to Format Cells, and the Alignment tab or by clicking the little button in the bottom right-hand corner of the Alignment box on the Home tab in Excel versions after 2007.
Play around with all of the alignment features until you find what you are looking for, though, to be honest, these are almost never used, with the exception of the Merge and Center feature.
To remove cell alignment formatting just re-select the cells and click the alignment option again. This works for basic alignment, merging/unmerging and text wrapping.
Note: Accompanying Excel file has a sheet for before the alignment formatting and a sheet for after. You can observe the differences between the 2.
Question? Ask it in our Excel Forum
Excel VBA Course - From Beginner to Expert
200+ Video Lessons 50+ Hours of Instruction 200+ Excel Guides
Become a master of VBA and Macros in Excel and learn how to automate all of your tasks in Excel with this online course. (No VBA experience required.)
Tutorial: How to input data into cells in a worksheet from a macro. Once you have data in your macro...
Tutorial: This Excel VBA tutorial focuses specifically on selecting ranges of cells in Excel. This...
Tutorial: How to prevent a user from entering any spaces within text in Excel. This allows you to...
Tutorial: How to limit the amount that a user can enter into a range of cells in Excel. This works...
Tutorial: How to use VBA/Macros to iterate through each cell in a range, either a row, a column, or ...
Macro: Count words in cells with this user defined function (UDF). This UDF allows you to count t...
Subscribe for Weekly Tutorials
BONUS: subscribe now to download our Top Tutorials Ebook!
Excel VBA Course - From Beginner to Expert
200+ Video Lessons
50+ Hours of Video
200+ Excel Guides
Become a master of VBA and Macros in Excel and learn how to automate all of your tasks in Excel with this online course. (No VBA experience required.)