How to Add, Remove, and Rearrange Columns and Rows in Excel
Adding, removing and rearranging columns is as easy as resizing. You just select your columns or rows, right click and then select Insert.
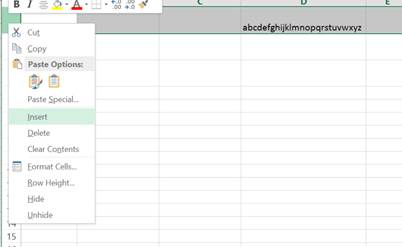
When adding rows, all of the rows in your selection are moved downwards and the new rows are placed above them.

This also works with columns and with more than one column/row at once. When columns are added all of the columns in your selection are moved to the right and the new columns placed to the left of them.

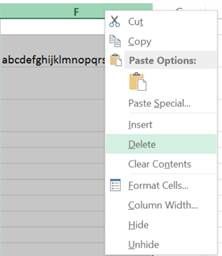
Deleting columns works in the same way. Just select your desired columns or rows and right click. You then select delete to remove. Below I am going to delete column F.
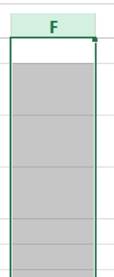
Column F is now completely blank after deleting. (Remember if you accidentally delete something you shouldnt have, use the Undo button [Ctrl+Y] to get it back)
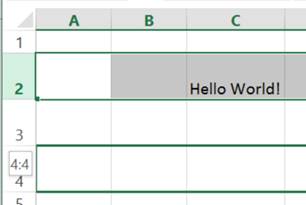
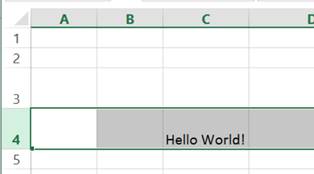
Another useful feature of Excel is the ability to rearrange columns and rows. Start by selecting your column or row, left click on the gridlines of the worksheet, NOT the column/row header, and drag up, down, left or right depending on where you want to move it. Below I selected row 2 and moved it down to row 4.
Note: The accompanying Excel workbook for this tutorial is split up into 3 separate parts on 3 different worksheets labelled Insert, Delete and Rearrange. This way you can follow through the steps I took in this tutorial.
Question? Ask it in our Excel Forum
Excel VBA Course - From Beginner to Expert
200+ Video Lessons 50+ Hours of Instruction 200+ Excel Guides
Become a master of VBA and Macros in Excel and learn how to automate all of your tasks in Excel with this online course. (No VBA experience required.)
Tutorial: Resizing rows and columns in Excel is an easy process. Simply left click in between the co...
Tutorial: How to delete duplicate values from a data set in all versions of Excel. This includes Ex...
Tutorial: In this tutorial I am going to introduce you to creating and managing charts in Excel. Bef...
Tutorial: This tutorial gives you an overview of what a UserForm Control is and how to add them to y...
Tutorial: How to find the last column in a row that has data. This includes selecting that column or...
Tutorial: In this tutorial I am going to introduce how to input, edit and manage excel formulas. To ...
Subscribe for Weekly Tutorials
BONUS: subscribe now to download our Top Tutorials Ebook!
Excel VBA Course - From Beginner to Expert
200+ Video Lessons
50+ Hours of Video
200+ Excel Guides
Become a master of VBA and Macros in Excel and learn how to automate all of your tasks in Excel with this online course. (No VBA experience required.)