Get Data from a ListBox Control
How to get data from a ListBox control and put it into a worksheet in Excel.
Sections:
Get Data from a Single Selection ListBox
Get Data from a Multiple Selection ListBox
Get Data from a Single Selection ListBox
ListBox1.TextListBox1 is the name of the ListBox with the selection.
Here is an example of using this feature where you take the selection from the ListBox and place it in cell B2 in the worksheet.
'Get input from ListBox
ListBoxValue = ListBox1.Text
'Store input in the worksheet
Sheets("Sheet1").Range("B2").Value = ListBoxValue
This puts the selected item into the ListBoxValue variable, which is then used to input that value into cell B2 on the worksheet named "Sheet1".
Note: If the option to make multiple selections is enabled, the above method will not work, even if the user selects only 1 item from the list; in such cases, use the next method.
Get Data from a Multiple Selection ListBox
(To enable multiple ListBox selections, view this tutorial: Multiple Selections in a ListBox)
Getting data for multiple selections requires more effort that the example above because we have to actually loop through all of the items in the list in order to see which ones have been selected.
'Loop through every item in the ListBox
For i = 0 To ListBox1.ListCount - 1

    'Check if the item was selected.
    If ListBox1.Selected(i) Then

        'If here, means this item has been selected.

        'Show selected items in a message box.
        MsgBox ListBox1.List(i)

    End If

Next i
This is a For loop in VBA.
ListBox1 is the name of the ListBox.
i is the variable that is used to loop through the items in the ListBox. When referencing an item from within the loop, you use this variable. This is used in the next two explanations in order to get information about the items during the loop.
ListBox1.Selected(i) returns a True or False value that lets you know if the item in the list was selected or not. This is what is used in the IF statement part of the code.
ListBox1.List(i) is how you reference the item from the ListBox while you are looping through the items.
MsgBox ListBox1.List(i) is a simple way for you to see what items have been selected. This is used for illustrative purposes.
In the sample file for this tutorial another line of code is included that will put all of the selected items into Column B in the worksheet. That line of code looks like this (it also goes inside of the For loop):
Range("B" & Rows.Count).End(xlUp).Offset(1).Value = ListBox1.List(i)Full Code to Put Values into the Worksheet
'Loop through every item in the ListBox
For i = 0 To ListBox1.ListCount - 1

    'Check if the item was selected.
    If ListBox1.Selected(i) Then

        'If here, means this item has been selected.

        'Put all selected items in Column B
        Range("B" & Rows.Count).End(xlUp).Offset(1).Value = ListBox1.List(i)

        'Show selected items in a message box.
        'MsgBox ListBox1.List(i)

    End If

Next i
The message box code was commented-out but left in so it's easier to see and understand.
Where to Put the Code
The above code, usually, should go inside of the code section for a command button; this allows something to happen with the ListBox selections after the user clicks a button.
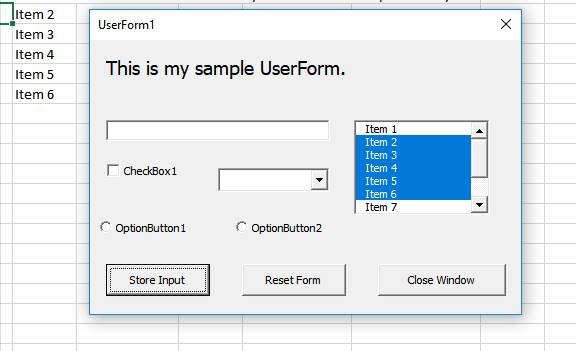
In the examples for this tutorial, and the included file, this code is at the top of the section for the Store Input button, named CommandButton2.
You can get to this code section by double-clicking the Store Input button from the form in the VBA window (Alt + F11).
Notes
You don't have to make two separate code sections for a ListBox to check if it allows for sinlge or multi-selections. You can always use the loop in the second section above and it will work in all cases.
The method for doing something with multiple selections can seem a little tricky, but you only really have to change the name of the ListBox to the name of the one you use and everything should work.
In the attached file, the ListBox is set to allow multiple selections using the Ctrl and Shift keys. This is done with this line at the top of the UserForm_Initialize() event:
ListBox1.MultiSelect = fmMultiSelectExtended
Download the sample file for this tutorial to work with these examples in Excel.
Question? Ask it in our Excel Forum
Excel VBA Course - From Beginner to Expert
200+ Video Lessons 50+ Hours of Instruction 200+ Excel Guides
Become a master of VBA and Macros in Excel and learn how to automate all of your tasks in Excel with this online course. (No VBA experience required.)
Tutorial: How to get data from a UserForm in Excel, including from: text inputs (TextBox), list boxe...
Tutorial: There are two different kinds of multiple item selections that you can have for a ListBox ...
Tutorial: Here, you'll learn how to get information from the Excel worksheet into a macro so you can...
Tutorial: Macro to get data from a workbook, closed or open, over a network or locally on your comp...
Tutorial: How to get data from separate workbooks in Excel. This tutorial includes an example using ...
Macro: This macro will pull the values from a chart in excel and list those values on another spr...
Subscribe for Weekly Tutorials
BONUS: subscribe now to download our Top Tutorials Ebook!
Excel VBA Course - From Beginner to Expert
200+ Video Lessons
50+ Hours of Video
200+ Excel Guides
Become a master of VBA and Macros in Excel and learn how to automate all of your tasks in Excel with this online course. (No VBA experience required.)