Allow Only Certain People to Edit Specific Cells in Excel
How to allow only certain people to edit certain cells or ranges in Excel.
This is a security feature that you can setup so that a user has to have a specific password in order to edit parts of a worksheet. This allows you to have more robust Excel files and to reduce the chance that someone messes-up something in the worksheet.
Steps to Allow Only Certain People to Edit Specific Cells in Excel
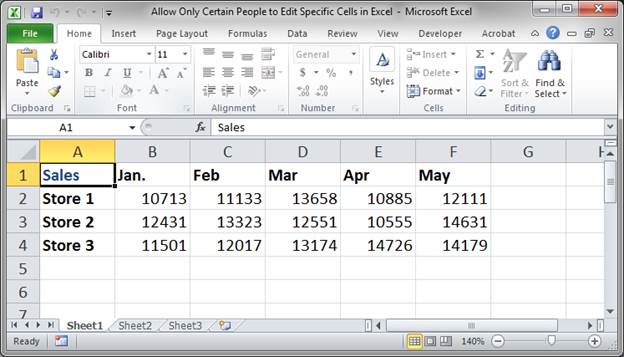
- Select the cell or range of cells that you want only a certain person to be able to edit.

- Go to the Review tab and click Allow Users to Edit Ranges.
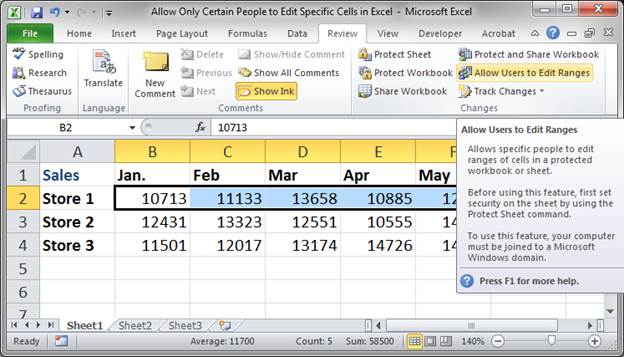
- A window will open; in that window, click New...

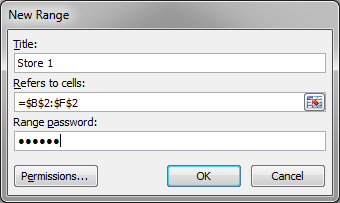
- In the window that opens, enter a title for the range, this is what you will see when you manage ranges that can be edited; make sure the cells that you want to be edited by the user are entered correctly, this should have happened already if you selected the desired cells before you got here; then, enter a password that the user must have in order to edit this range of cells.
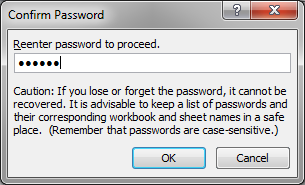
When you are done, hit the OK button. - In the next window, you will have to re-enter the password you used in the previous window and then hit OK.
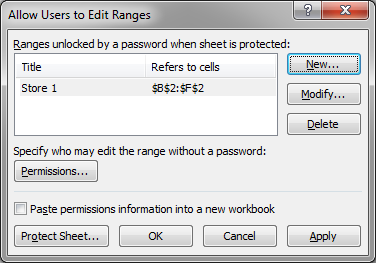
- Now, you will see the password protected range of cells and the title for that range in a list.
- Hit New to add another range if you want. (Otherwise hit OK and skip to step 11)

- Here, you will repeat step 4. The difference now is that you will need to select the new range that you want to be password protected. To do that, click the little box to the right of the input box for the Refers to cells: section.

Then, select the desired cells: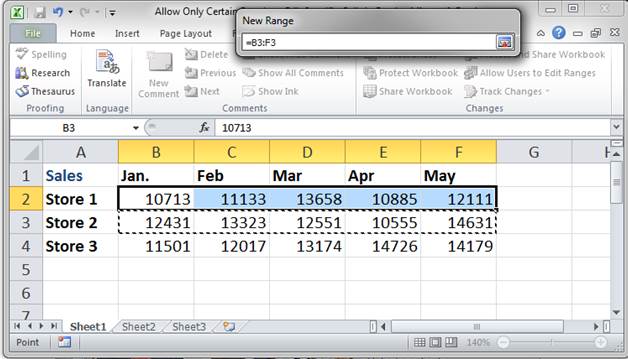
Then, hit Enter or click the little box on the right side of the tiny window again.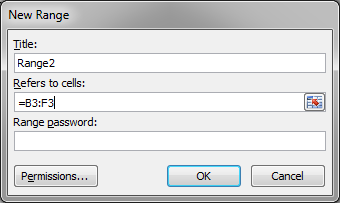
Now, your new range has been selected and is ready to go. Finish filling out the Title and the Password like we did above and then hit OK and re-enter the password. - Now, we have two password protected ranges.
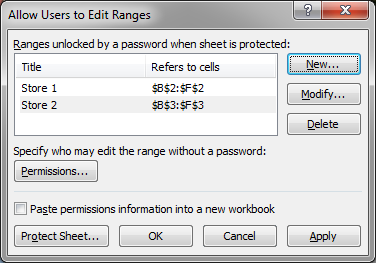
- Repeat Steps 7 to 9 as much as you need to add as many password protected ranges as you need. When you are done, hit OK on the window that lists the ranges, the one shown in Step 9.
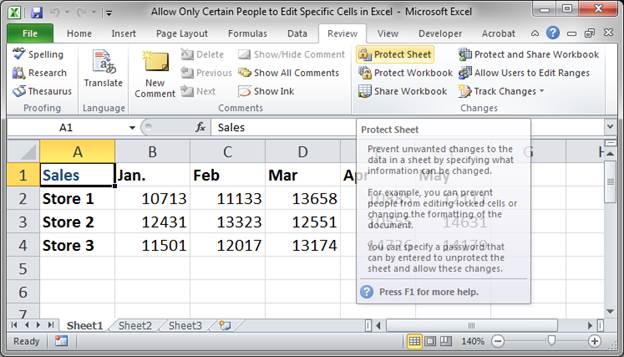
- We are not done yet. In order to make this work, we need to protect the worksheet. Make sure that you are still viewing the worksheet where you added the password protected ranges and then go to the Review tab and click Protect Sheet.
- In the window that opens, type a password that will be used to lock the entire worksheet. Once the worksheet is locked, only those that have a password to edit specific ranges will be able to edit anything, unless, of course they have the password that was used to lock this sheet. After entering the password, hit OK.
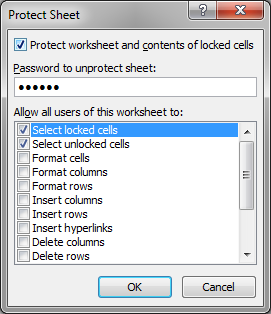
- Re-enter the password on the next window and hit OK.

- That's it!
Now let's test it out.
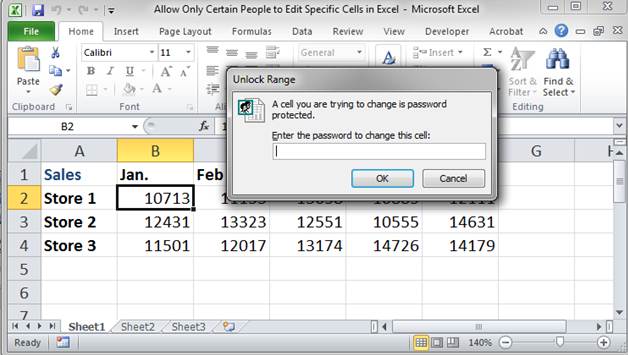
When you try to edit a cell that was password protected, you must have the correct password in order to edit that cell.
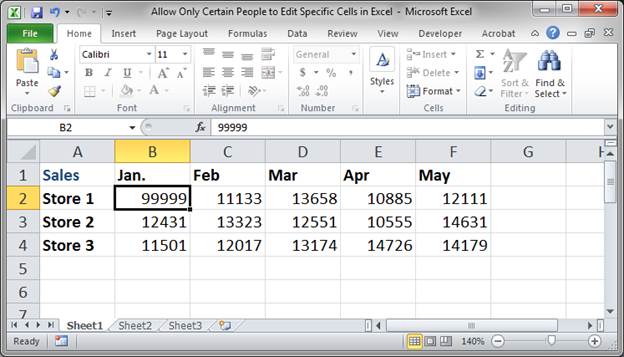
Once you enter the password, you can freely edit that range of cells.
Remove Password Protection from Cells
To remove password protection from the sheet or a specific range you must first remove the worksheet protection and then remove that specific range's protection.
Unprotect the Worksheet: Review tab > Unprotect Sheet > then enter the correct password and hit OK.
Unprotect Specific Ranges: Review tab > Allow Users to Edit Ranges > select the desired range from the list > hit Delete > hit OK.
Notes
Make sure to use different passwords for each range so that a user cannot unlock and edit a range that they are not supposed to be able to access.
Any ranges or cells that are not allowed to be edited by specific users will not be editable by anyone unless they have the password used to unlock or "unprotect" the worksheet. This is standard behavior for protected worksheets.
You can get to the Protect Sheet window from the Allow Users to Edit Ranges window by clicking the Protect Sheet... button in the lower left corner of the window (you can see this button in Step 9 above).
Passwords:
The passwords below are to unlock the ranges and the sheet protection for this worksheet. Never EVER use these passwords for anything! They are kept simple only for this example. Make sure to download the sample workbook so you can try this out.
Store 1: 123456
Store 2: qwerty
Protect Sheet: 123456
Question? Ask it in our Excel Forum
Excel VBA Course - From Beginner to Expert
200+ Video Lessons 50+ Hours of Instruction 200+ Excel Guides
Become a master of VBA and Macros in Excel and learn how to automate all of your tasks in Excel with this online course. (No VBA experience required.)
Macro: This free Excel macro allows you to print a pre-specified selection of pages from Excel. T...
Macro: Hide specific comments in Excel with this macro. Comments are still visible on hoveri...
Tutorial: This macro allows you to have a cell automatically locked after a user enters something in...
Tutorial: Find if a cell or range of cells contains a specific value in Excel. This method can be us...
Tutorial: How to limit the amount that a user can enter into a range of cells in Excel. This works...
Tutorial: How to count cells that match text at the start or the end of a string in Excel. If you w...
Subscribe for Weekly Tutorials
BONUS: subscribe now to download our Top Tutorials Ebook!
Excel VBA Course - From Beginner to Expert
200+ Video Lessons
50+ Hours of Video
200+ Excel Guides
Become a master of VBA and Macros in Excel and learn how to automate all of your tasks in Excel with this online course. (No VBA experience required.)