Excel Data Validation - Limit What a User Can Enter into a Cell
Data Validation is a tool in Excel that you can use to limit what a user can enter into a cell. It is a great tool for creating forms or really anything where you want to ensure that erroneous values are not entered into a spreadsheet.
Sections:
What is Data Validation in Excel?
- Any Value
- Whole Number
- Decimal
- List - Includes Drop Down Menu
- Dates
- Time
- Text Length
- Custom - Versatile Validation
What is Data Validation in Excel?
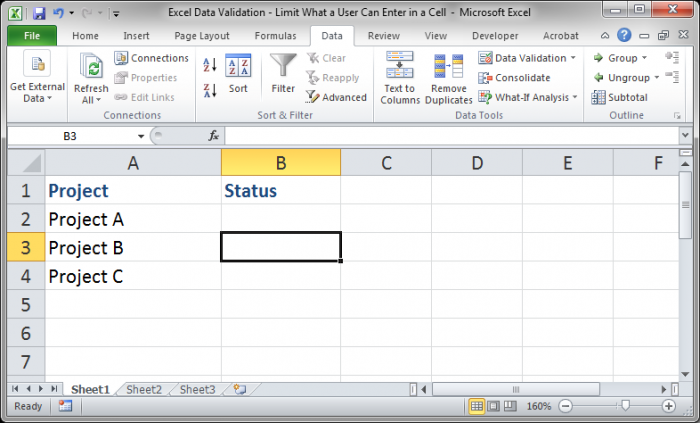
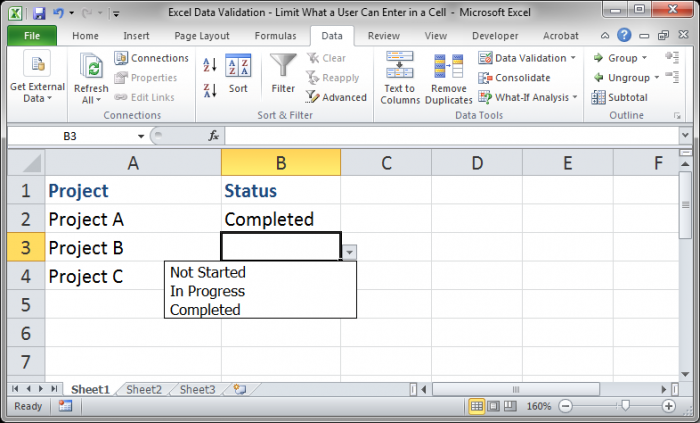
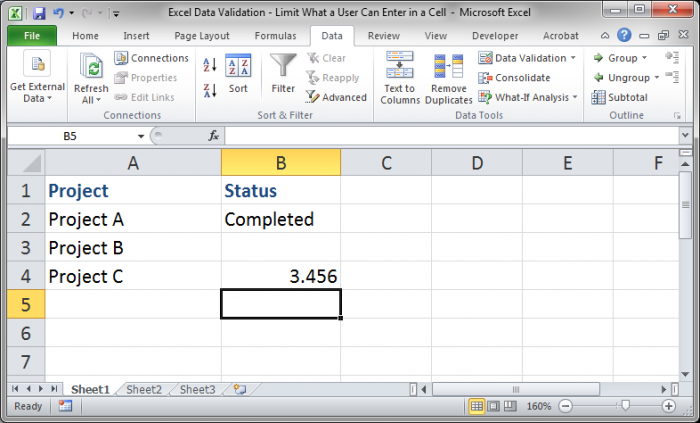
Here is a simple example of Data Validation used to create a drop-down menu that allows a user to select a value to input into a cell:

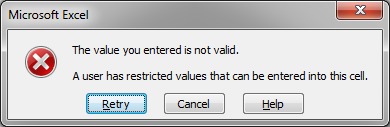
If you try to enter a value not on that list, you will get an error message like this:
How to Add Data Validation to a Cell
- Select the desired cell.
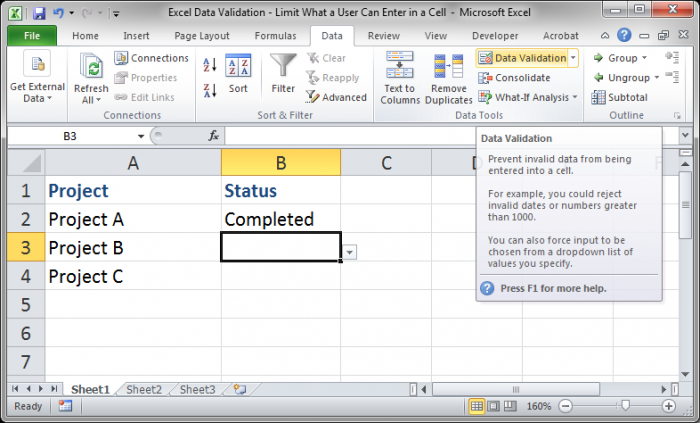
- Go to the Data tab and click the Data Validation button (In Excel 2003 go to Data > Validation in the top menu).
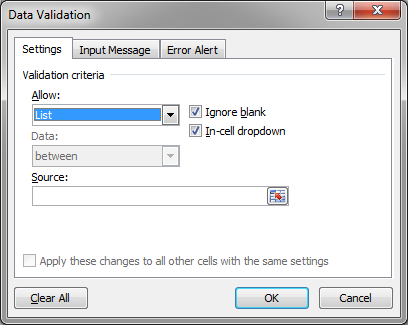
- Choose the type of Data Validation that you want under where it says Allow.
- Here, I chose List.
- Fill-out the remaining options that appear, in this case just the Source field.
- Hit OK and then you have added Data Validation to a cell in Excel!


Types of Data Validation and How to Use Them
The trickiest part about Data Validation is to know what to put into the Source field, especially for the Custom type.
In the next sections, I will go through all of the different types of Data Validation and show you how to correctly limit the input of values into cells. The different types are all located in the Allow drop down menu:
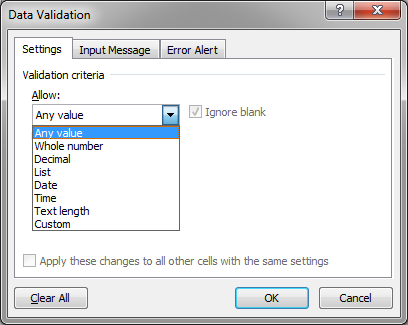
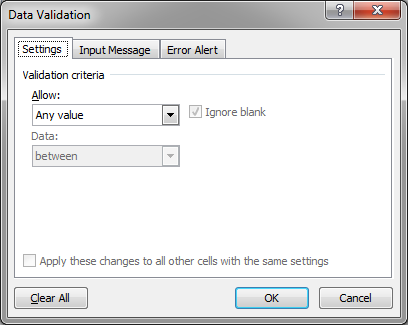
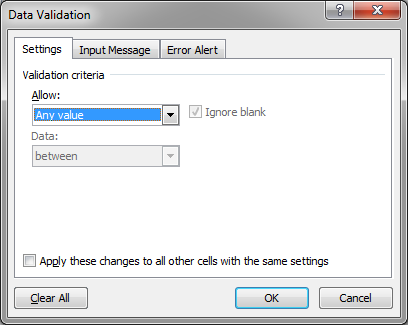
Any Value - Allow Any Value to be entered into a Cell
This is the default setting for any cell in Excel and it means that you can input anything into that cell.
If you want to completely remove Data Validation from a cell, you can select this option, which is the same as clicking the Clear All button in the bottom left of the window.
Whole Number - Allow only Whole Numbers to be entered into a Cell
This allows you to limit the input of a cell to a number that does not have any decimal places but which is between two other whole numbers.
You can limit a cells input to a number between 1 and 5 or 500 and 1000 or whatever you want so long as the number is a whole number.

Put the smallest number you want to allow in the Minimum field and the largest number you want to allow in the Maximum field like this:
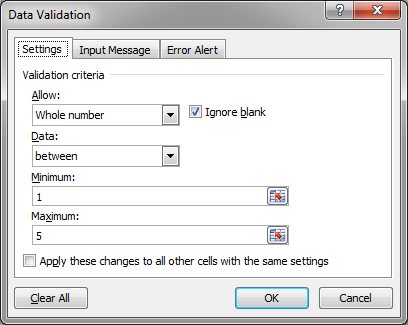
This says that the smallest number you can put into the cell is 1 and the largest is 5.
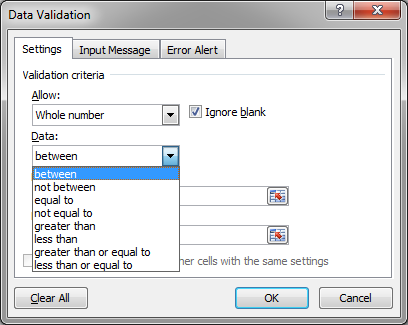
The default setting for the whole numbers is to limit the input to a value between two numbers. If you want to change that, simply change the option in the Data dropdown menu:
Decimal - Allow Only Numbers to be entered into a Cell, Including Numbers with Decimals
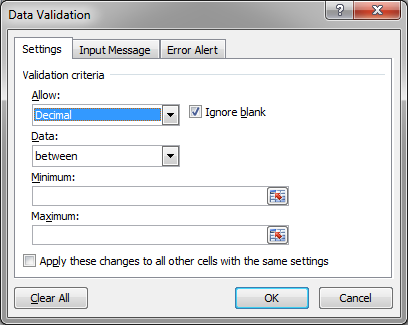
This is similar to the Whole Number example above except that we can now put numbers with decimals into the cell.
For instance, we can now allow a user to input numbers like 1.5 or 3.33 or 100.23434 into a cell but still limit the smallest and largest number that is allowed to be entered into the cell.
Now lets input 1.5 into the Minimum and 5.5 into the Maximum fields.
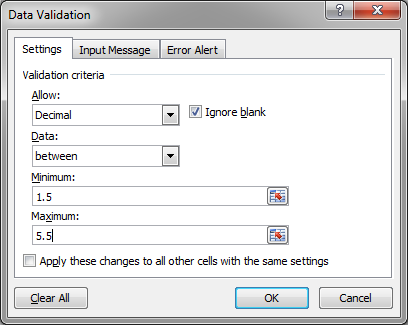
Once we hit OK, we can now input any number between 1.5 and 5.5 into the cell.
This means we can do something like this:
The default setting for the decimal numbers is to limit the input to a value between two numbers. If you want to change that, simply change the option in the Data dropdown menu:

List - Restrict the Input into a Cell to a Predefined List of Values (Including a Dropdown Menu List)
This is one of the coolest uses for Data Validation because it allows you to put a dropdown menu in a cell in Excel. This makes it so that a user can only put a value from the list into the cell.
This is also the example that was used toward the top of the tutorial to show you how to use Data Validation.
Here is the screen used to create the list:
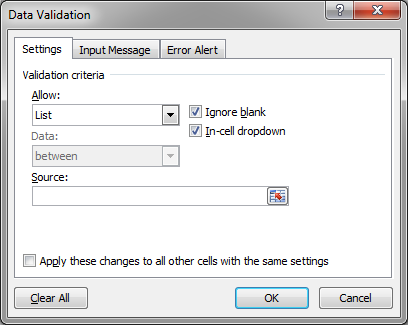
If you want to have a dropdown menu in the cell, make sure to check the option In-cell dropdown. If you dont do this, the user will still be limited by what they can enter into a cell, they just wont see a menu or anything that shows them what they can put into the cell.
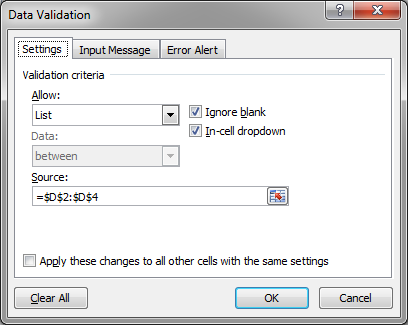
There are many ways to create the list, but each of them has to do with what you put into the Source field.
You can input a range of cells that contain a list of values:
Or, you can simply type a list of values directly into the Source field:
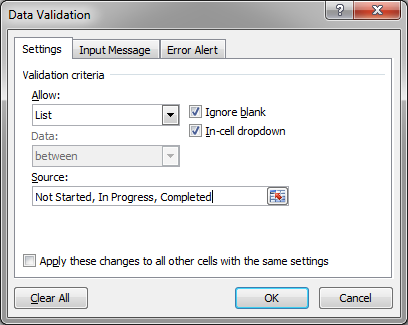
Notice that you do not need to enclose the text with quotation marks. You simply need to separate each value with a comma. This works the same with numbers:

You can also use text and numbers together here or even reference a range of cells from another worksheet for the list, just like you would reference cells from another worksheet in a formula.
This is one of the most used features of Data Validation because it allows you to show the user what they can input into the cell without adding clutter to the spreadsheet.
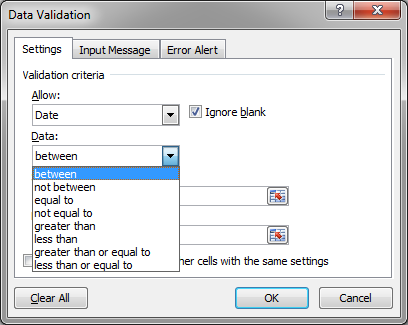
Date - Limit Cell Input to a Date
This feature allows you to limit cell input to a date and then limit the dates that can be input into the cell.

Fill-out the Start date and End date fields with a date in a format that Excel can understand or a reference to a cell with a date and thats it:

The default setting for the dates is to limit the input to a value between two dates. If you want to change that, simply change the option in the Data dropdown menu:
Time - Limit Cell Input to Time
Time works just like Date in that it limits the times that a user can input into a cell. Also, it limits the input of a cell to only a time value so you need to make sure you input time in a format that Excel understands.
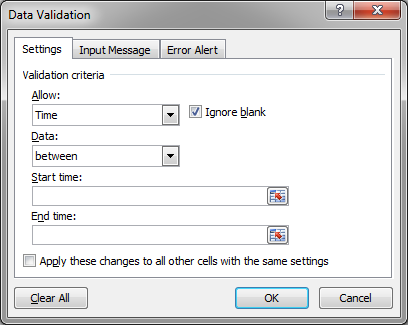
Input the times in the Start time and End time:
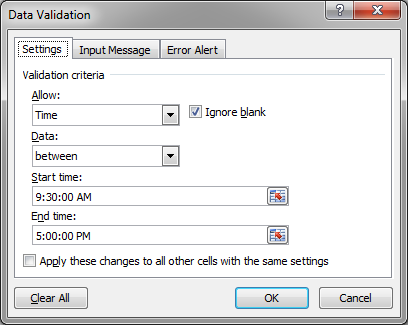
Note that my Excel is using AM and PM, but the 24 hour clock will work as well without a problem.
The default setting for the time option is to limit the input to a value between two times. If you want to change that, simply change the option in the Data dropdown menu:

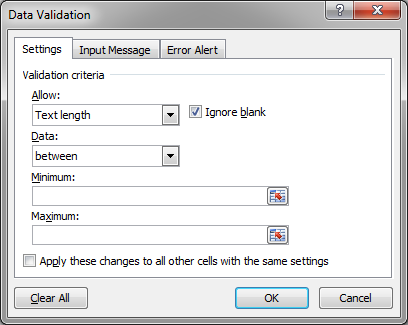
Text length - Restrict Cell Input to Text and Control its Length
This is pretty simple; it allows you to limit the number of characters that can be input into a cell and restricts those characters to text characters, which includes most normal characters that a user might use, including numbers and punctuation.
Lets put 5 for Minimum and 10 for Maximum:
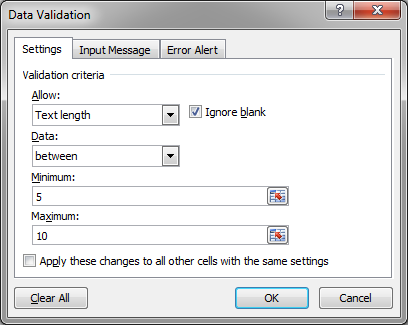
This means we must put a minimum of 5 characters in the cell but cannot put more than 10 characters into the cell.
Note that spaces are included in the character count.
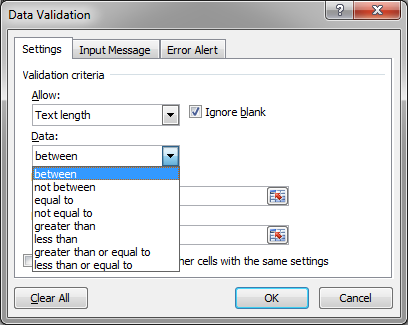
The default setting for text length is to limit the number of characters that can be input to a number between two numbers. If you want to change that, simply change the option in the Data dropdown menu:
Custom - Limit Cell Input to Anything You Want in Excel
This is where Data Validation gets tricky, but also where it can be most useful.
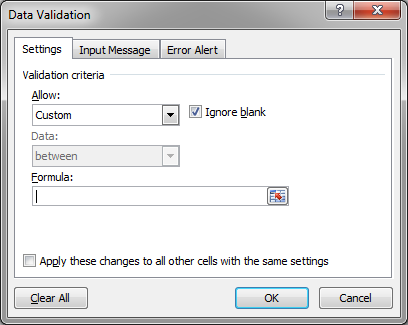
Here, you have only one field to work with, the Formula field.
You must put a formula or function that evaluates to TRUE or FALSE in this field. That is, the formula must be a logical formula which will only ever return TRUE or FALSE.
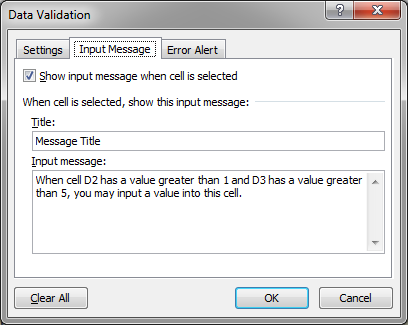
You can put functions within functions and complex mathematical calculations or simply check many different cells at once. For instance, you can make the input of a cell allowed only when two other cells reach a certain value:
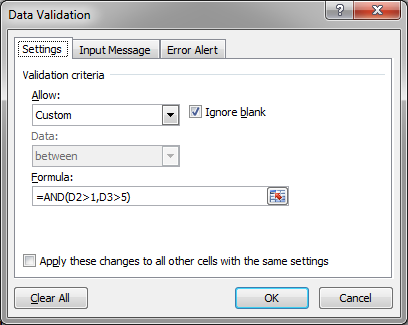
This says that Excel will allow input into a cell ONLY when cell D2 contains a number greater than 1 and cell D3 contains a number greater than 5.
This is a very simple example, but you can put just about any kind of formula, that checks just about anything, into Data Validation to prevent entry of a value or certain values into a cell; these more complex examples will be covered in other tutorials.
Cell References in Data Validation
All of the fields that require input for Data Validation can also reference a cell in the worksheet or on another worksheet in the same workbook. The little button to the right of the input fields, when clicked, will minimize the window to allow you to more easily select cells from the worksheet. Once the button has been clicked, it will look like this:

Hit the button to the right or the red X in order to close the window and get back to the previous one.
Remove Data Validation
To remove Data Validation, simply select the desired cell or cells and go to the Data Validation window (Data tab > Data Validation) and click the Clear All button in the bottom left-hand corner of the window:
Help Inputting Data into a Cell
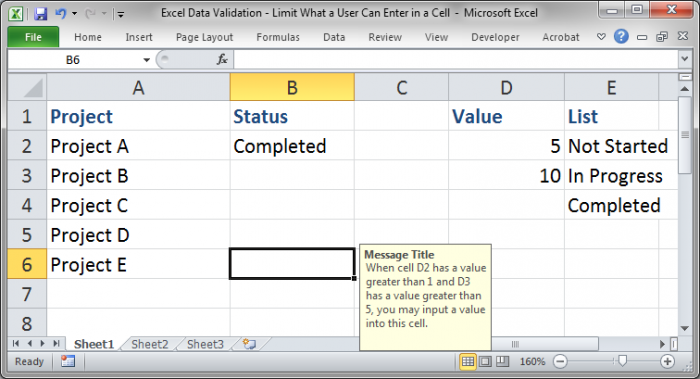
You can create a message that appears when a user selects a cell that has Data Validation. This message allows you to tell the user what or when they can input a value into the cell. Basically, you can input anything you want here.
Go to the Data Validation window and then to the Input Message tab:
This is very helpful when you use Data Validation that is not the dropdown list menu because a user might otherwise not know what can be entered into the cell.
Here is an example for our Custom Data Validation example above:
This message only appears when you select the cell and not when you just move your mouse over the cell:
Custom Error Messages
Custom error messages are a cool little thing that allows you to change the default error message to whatever you want. The error message appears when a user tries to enter an invalid value into a cell that is using Data Validation.
Here is the default error message:

While this is nice in that it tells the user what is happening, it doesnt help them understand what they need to do.
Go to the Data Validation window and then to the Error Alert tab:
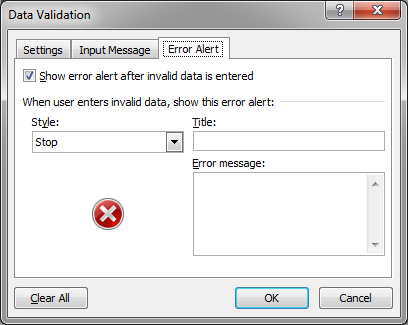
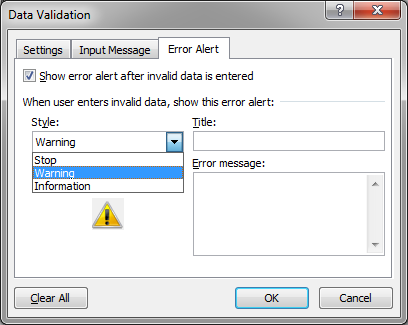
Here, you can select what kind of icon you want for your error (more about this below):
And then you can input a title and a message:
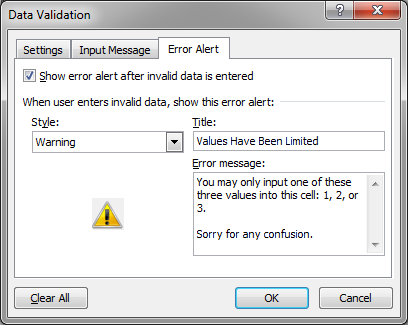
Now, lets look at our message when we try to enter an incorrect value:
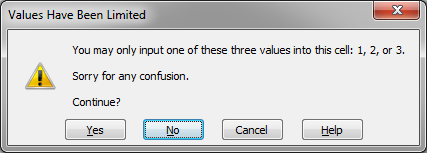
Notice that this time, we are allowed to continue with inputting the value, even though it is not supposed to be allowed in the cell. This is because we chose the Warning style error message. This is a very important thing to remember that you are not simply changing the icon but also the functionality of the error message when you change the Style option.
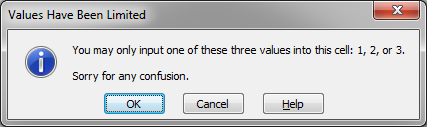
The Information option also lets us keep the incorrect value after it has popped-up:
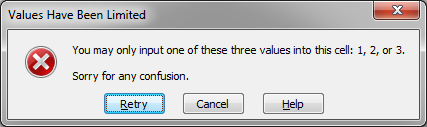
The only one that will actually stop the input of the incorrect values is the Stop style:
Notes
Whew, as you can see, there are a lot of options when it comes to limiting the input of data into a cell in Excel and we havent even scratched the surface of the more complex possibilities.
You can have dynamically updated lists, complex formulas limiting what text can go where in a cell, limits on the number of spaces in a cell, and basically, anything you can think of.
You can even create helpful messages that appear when a cell is selected, helpful error messages, or allow incorrect values input into a cell after displaying a warning.
Data Validation is a great tool for keeping data integrity in your workbooks, especially when you send them out to other people who must input data in the correct way!
Combine this with protecting cells and worksheets and you can create foolproof Excel files.
Make sure to download the Excel workbook for this tutorial so you can see many examples of data validation in action.
Question? Ask it in our Excel Forum
Excel VBA Course - From Beginner to Expert
200+ Video Lessons 50+ Hours of Instruction 200+ Excel Guides
Become a master of VBA and Macros in Excel and learn how to automate all of your tasks in Excel with this online course. (No VBA experience required.)
Subscribe for Weekly Tutorials
BONUS: subscribe now to download our Top Tutorials Ebook!
Excel VBA Course - From Beginner to Expert
200+ Video Lessons
50+ Hours of Video
200+ Excel Guides
Become a master of VBA and Macros in Excel and learn how to automate all of your tasks in Excel with this online course. (No VBA experience required.)